Sunday 31 March 2013

easter egg and chick nails


sorry the quality of the photo isn't as good as normal, it was taken using my iPhone! But this is just a quick post to show you my Easter nails as it's Easter today and it would be a bit weird if I posted this tomorrow! I've already posted bunny rabbit nails with a tutorial here but I did these ones the other day too so I thought I would show you them- let me know what you think! I did a post with nails like this last year too which is weird to look back on- it doesn't seem a year ago!

I used the Rio nail art pens for the detailing and the design was inspired by Cutepolish


my everyday 10 minute makeup routine


I always find it interesting to see what people use to go from bare faced to made up every day, so I thought you might want to see what I use too- I hope you like it! Here is a link to my channel and I would LOVE it if you could click the subscribe button for me!

products used:
benefit porefessional
benefit hello flawless foundation
real techniques buffing brush
benefit fake up concealer*
real techniques deluxe crease brush
collection lasting perfection concealer
urban decay primer potion
urban decay naked basics palette
real techniques base shaddow brush
sigma E25 blending brush
look beauty brow perfect palette
real techniques brow brush
elf eyelash curlers
soap and glory thick and fast mascara
rimmel scandal eyes eyeliner in 'nude'
peggy sage parish highlighter
elf bronzing brush
elf contouring and bronzing powder
the body shop travel brush
benefit hello flawless powder*
real techniques blush brush
rimmel lasting finish lip liner in 'indian pink'
revlon 'cherries in the snow' lipstick
urban decay all nighter setting spray


Friday 29 March 2013

how to do bright lips that last all day


I will very rarely leave the house without some form of bright lipstick on. Today I have a post to show you what I do when I want to wear a bright lip. The products I used were the Burts Bees lip balm (present from Helen), Rimmel lip liner in 'Indian Pink' and Revlon 'Cherries in the snow' lipstick (all time favourite). As you can see  before I use the products I look half dead and there is no colour in my face but once I've added the lips it looks much better!

First off I start by moisturising my lips to stop any of the product clinging to any dry patches (vom). I do this before I start putting any of my makeup on to give it time to sink in properly.
Next I take the lip liner, which as I said above was Indian Pink by Rimmel which I find helps to keep the lipstick in place for longer as it acts as a primer and makes the colour more vivid.
Draw a cross over your cupids bow on your lips which I find is the best way to make sure your lips have a good shape to them and looking full once you've finished all the steps.
Then line down both of the sides of the top lip and around the bottom lip, going slightly over the natural line to make your lips a tiny bit appear bigger.
Once you've done this you can fill them in (unless you're going for the whole lip liner just around the lips look which I really wouldn't recommend you do...).
Neaten up round the edges if you need to and then go over the top in the lipstick of your choice. I do the same method of doing a sort of cross on my cupids bow and then filling the rest in to keep the shape.
And you're done! I love wearing bright lipsticks and this is the easiest way I've found to do them. I am in no way an expert but bright lipstick is something I wear every day without fail and this is the best way I've found to do them. I really recommend trying a lip liner if you don't already use one as they really do keep the lipstick in place for longer. I find that using this method and these products it will stay in place for at least five hours before I have to give it a quick top up after I've eaten.

What did you think of this sort of post? Is it something you would like to see more of in the future? Leave your lipstick and lip liner recommendations below please!


p.s. I would LOVE it if you could give my blog a cheeky follow on bloglovin!


Tuesday 26 March 2013

easter bunny nails step by step tutorial


so last year I did an easter egg nail art tutorial which went down really well (it's one of my top viewed posts but I'm not all that sure why...) and this year I thought I would do bunny rabbit ones! They are really easy to do and I did step by step photos along the way which has been requested so that you can follow it too! The background was 'lucky lucky lavendar' by OPI and I think pretty much any pastel colour would look good as a background!
Please let me know if you like how I've been doing these as a mini tutorial recently instead of just showing you the finished nails as I love your feedback and if you give them a go then I would absolutely love it if you showed me a photo!

p.s. I would really appreciate it if you gave my blog a follow on bloglovin or hellocotton!


Sunday 24 March 2013

Benefit fake up review and swatches


so last Thursday I was invited to the blogger launch of the brand new Benefit fake up concealer in Brighton (pretty cool, huh?). I've already posted about the event itself here but now it's time for the review of their new product fake up.
Fake up is a concealer designed specifically for under the eyes as the skin is much thinner there than the rest of your skin so it needs extra care taken of it. It is essentially two products in one as it has the concealing aspect to it along with the moisturising which is something I haven't really seen before in a concealer. This is where the moisturising ring around fake up concealer comes in handy. Enriched with vitamin E and apple seed extract, fake up promises to hydrate your skin for up to six hours which is impressive! When I was at the event we were told that 100% of the women they tested it on agreed with this statement!
Firstly the packaging of these is very nice, it's in a metal tube and it twists up, sort of like a lipstick would and so it's perfect for traveling.
To use it you simply draw it on in a V shape under both of your eyes and blend it in with either your ring finger or a brush (I use the Real Techniques deluxe crease brush). It helps to brighten, conceal and hydrate your skin all day without it creasing which I often found happening with my Collection lasting perfection concealer or the Benefit erase paste which I had been using before. I used to find that my concealer would go on quite cakey and heavy but fake up really doesn't at all! I find that it also stays in place well once set with a powder which I was scared it wouldn't as it's not a heavy product.
I don't usually have much of a problem with dark circles around my eye area and if I'm being 100% honest I didn't see much of a difference when using it under my eyes (see the photos above) but I do feel it slightly brightened the area.
If you have quite fair skin like me then you can use the deep shade as a coutour. Simply draw a line under your cheekbone and blend out with your hand again or a brush (I use the Real Techniques countour brush for this). I tend to skip doing this on a day to day basis but I would if I was going out somewhere nice!

To see it in action check out my everyday makeup routine video which I posted here

Overall I do think this is a nice product if you don't suffer from bad dark circles like me as it doesn't have a huge amount of coverage to it but it's great how it is two products in one and doesn't crease or look cakey throughout the day.

Fake up launches on the 30th of March and will retail for £18.50. It comes in three shades- light, medium and deep (to be honest it would of been nice to see more of a shade range as I used the lightest shade and my skin isn't as fair as some people's) and can be found at all Benefit counters or online on the Benefit website.


although the Benefit Fake Up was a pr sample for reviewing this does not influence my opinion in any way and it is 100% honest as always


Friday 22 March 2013

makeup collection and storage


  I did a room tour video quite a while ago and ever since I've had people asking me to do a makeup collection/storage one. I actually put some effort into editing this video instead of the rambled ones I normally do so let me know what you think of this style of video and if you have any editing tips for me as I haven't really done it before!

Here is a link to my YouTube and I would absolutely love if you could subscribe (I'm almost at 400 subscribers now, eee!)


Wednesday 20 March 2013

Cath Kidston nail art


I was inspired to do these when I saw a lovely girl called Elsa post ones to her instagram (elsafarrer) and I thought I would do ones similar! Her ones had blue flowers but I thought I would stick to what I know and go for the peach and red roses which I normally do. I like how they have a mixture of spots, stripes and flowers and they are very Cath Kidston inspired to which if you know me is something I love!


I'm going to be starting a nail art for beginners type series soon- do you have any questions you'd like me to answer or anything you'd like me to include in it?


p.s. I'd love you forever if you could give my bloglovin or hello cotton a quick follow!


Monday 18 March 2013

nautical nails

blue: barry m 'blueberry ice cream'
red: rimmel 'double decker red'
white: Rio nail art pen*
anchors: skin art nail art tattoos*

I showed these nails in an OOTD post a few days ago (here) and you all seemed to love them! I painted them using the Skin Art nail art tattoos* which I reviewed here. I said in the post that I was going to do more designs and post them so here we are!
I think these will look really cute in the spring with a white dress and sandals if you were at the beach (can it stop snowing already...)


Friday 15 March 2013

Benefit Brighton Fake Up event

all the lovely bloggers and makeup artists
some of the makeup I wore to it (I had to do my makeup in the sixth form toilets like the classy girl I am...)
face/hair of the day (sorry about the toilet background...)
outfit
head Benefit makeup artist Lisa doing a fake up demonstration
me with the lovely Benefit ladies

with the lovely Catherine

with the lovely Laura

with the lovely Rosie

the goody bag contents (full reviews coming soon!)


on Thursday I got the chance to go to the Benefit fake up launch in Brighton which was in a really cute bar called the Memerist. As I had never been to an event before I was really looking forward to it especially as Benefit is one of my favourite brands! I thought I would share a few photos of the evening with you and I'm going to do a separate review which will be up in the the next week or so. All of the bloggers were so lovely and I would love to meet all of them again! (speaking of meet ups have you checked out Helen's London meet up for July yet?
The evening started off with the head makeup artist for Benefit called Lisa telling us about fake up and doing a demonstration which was very interesting to hear more about the product and the ingredients. We then had drinks (which was an amazing champagne, vodka, cranberry and lemon cocktail I think?) and little nibbles whilst Lisa and the other lovely Benefit ladies applied fake up and the hello flawless powder to us so that we could see what we thought (my first impressions are very good by the way!)
Overall it was a great evening and now I can't wait to go to more events in the future- thank you so much Benefit for inviting me!

Bloggers that attended:
Catherine
Laura
Rosie
Annabelle
Steph
Megan
Lilla
Sophie
Hannah

Please leave a comment with your blog link if you came so that I can add it to this post as sadly I didn't get to chat to everyone!


It would absolutely make my day if you could give me a follow on bloglovin!

Wednesday 13 March 2013

we'll go where nobody knows, with guns hidden under our petticoats


shirt: tesco
jeans: HM
watch: river island
earrings: topshop
nails: nautical using the nail art tattoos by skin art*
lips: rimmel 107

I've been quite good at posting outfits more regularly recently so here's another one for you! I bought this top after seeing Laura get one similar (it was much cooler though because the polka dots were all different sizes) but I couldn't find any over here in England so I had to settle for this one! It was only £14 which I thought was really good! I think it fits in with the whole monochrome trend but it's also quite fun too (can a shirt be fun?!)
I randomly decided to go for a nautical theme on my nails using the skin art nail tattoos which I reviewed here the other day and so many of  my friends have asked about them as they look like I painted on the anchors!


Tuesday 12 March 2013

New Look, Topshop, Boots and Romwe haul


haul posts are one of my favourite posts and I know you like them too so here is another one! Here is a link to my YouTube if you would make my day and subscribe that would be amazing!


Sunday 10 March 2013

skin art nail art tattoos and nail polish reviews

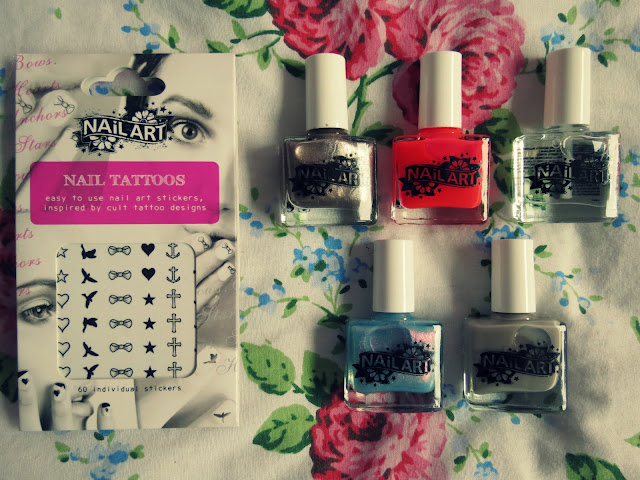
every time I post any of my nail art either on here, on twitter or on my instagram I am flooded with lovely comments from people saying that they love it but they would never have the patience or time to recreate it. Well- I am here with a possible solution to all your problems. Let me present to you the nail art tattoos by the brand skin art. Based around cult tattoo designs they allow you to really easily spruce up any nail design with minimal skill or effort involved.
To use, simply paint your nails in the colour of your choice and allow it to fully dry. Then peel off the nail tattoo from the sheet with the design of your choice and place onto your nail. I used tweezers to make the application process easier and to have more precision. Simply finish with a top coat (I used the Nails inc. caviar one) to prevent them from peeling off and make them super shiny.
Once applied they look really realistic as if you've painted them yourself (I fooled my sister into thinking that I had painted the bird ones by hand) and will last on your nails for around 3-5 days depending on which base/top coat you use. To remove you simply use nail polish remover and a cotton pad to remove the polish and then I picked off the tattoo.


what I love about these is that there's so many possibilities with the designs you can do. I used the bird ones with a plain blue background to show how simple they can be but if you wanted you could so a simple ombre, polkadot or striped background and then apply the tattoo on top to jazz it up a bit. I can't wait to use the bow ones with maybe a bit of pink and white polkadots going on too to give it a bit of a minnie mouse feel to it!

I will be experimenting more with these using different backgrounds like I mentioned above so look out for those coming soon! There are 60 individual stickers in each pack so that's enough for 6 manicures and they retail at 5.99 which works out at 1 per manicure, not bad if you ask me! They are available on Boots and from the Skin Art website.

Skin art also sell nail polishes and they very kindly let me review them too- here's what I think of them!


the first thing that I noticed was the really cute names of these- the neutral grey/brown shade called 'mine's a skinny latte' is my favourite, it's just so cute! Now, onto the actual nail polish.

I thought I would try this one first as I wanted to get on the whole nude nail bandwagon like lots of other bloggers are at the moment. I like how neat it looks compared to how I normally have some form of nail art on the ends of my fingers. It took me three coats to make it completely opaque like this, which is quite annoying as I usually only do two coats. On the other hand, I'm not sure what it is about these nail polishes but they have an almost gel like finish to them. They are super glossy and barely chip at all- this photo was taken after it being applied for two days- completely chip free as you can see! I used the Nails inc. caviar base and top coat which I love and this may be part of the reason why they last so well but it must be down to the quality of the actual nail polish too!
the second colour I tried out was the shade 'what colour is coral' which is the complete opposite of 'mine's a skinny latte' as it's so bright! I painted my nails with this as it was raining and miserable outside- I just can't wait for summer now so I can have a tan and bright nails! I only had to do two coats for this one to be opaque compared to the three from the first one. This one also has a gel like finish to it and as you can see in the photo they are very shiny! I only painted my nails with it today but there are no chips as yet so far so good!

The nail polishes are priced at £3 each and are available here

Do you like the concept of nail art tattoos? Let me know if you will be trying them and don't forget to look out for more posts to come with other designs!


although the nail polishes and nail art tattoos were sent to me for review purposes this does not influence my opinion in any way and it is 100% honest as always